Create a Simple Calculator using LWC
Let us create a simple calculator app with Lightning Web Component (LWC) in Salesforce.
Pre-requisites to get started -
- Create your org if you don’t already have one - we don’t need to check-in any code
- Create a new project in VSCode in VSCode and connect to your org (or, open an existing project)
Hit Ctrl+Shift+p > enter sfdx: Create a new Lightning Web Component. Provide a name (SimpleCalc), choose a default location for the file, and press enter to create a new LWC.

LWC consists of -
- a HTML page
- a Javascript file
- a metadata XML
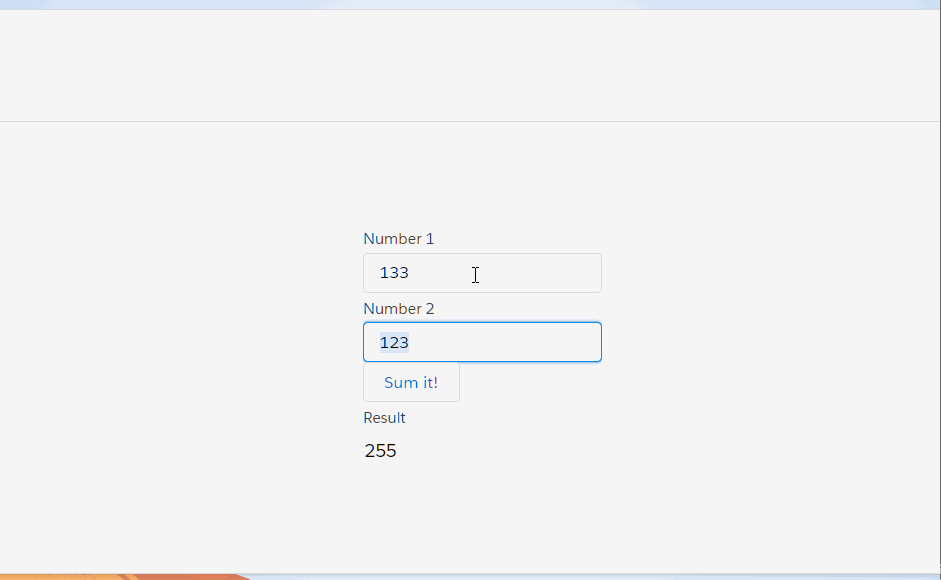
The first two components are important to us. Let us start creating our component with simple addition. Open simpleCalc.html -
<template>
  <lightning-input label="Number 1" name="num1" onchange="{handleChangeNum1}">
  </lightning-input>
  <lightning-input
    label="Number 2"
    name="num2"
    onchange="{handleChangeNum2}"
  ></lightning-input>
  <lightning-button label="Sum it!" onclick="{calcExpr}"></lightning-button>
  <lightning-input
    label="Result"
    name="result"
    read-only="true"
    value="{result}"
  ></lightning-input>
</template>
Nothing complex so far. All we have done is -
- Create two
lightning-inputcomponents that are lightning versions of input boxes handleChangeNum1calls method in the JS file ononchangeevent- Finally we tie back yet another
lightning-inputwith withresultcalculated in JS withvalue={result}
Include the calculations/processing logic in simpleCalc.js -
import { LightningElement, track } from "lwc";

export default class SimpleCalc extends LightningElement {
  @track num1;
  @track num2;
  @track result;

  calcExpr() {
    this.result = Number(this.num1) + Number(this.num2);
  }

  handleChangeNum1(evt) {
    this.num1 = evt.target.value;
  }
  handleChangeNum2(evt) {
    this.num2 = evt.target.value;
  }
}
Note that-
- We instruct LWC to track key variable values with
@trackdecorator - Event handlers to handle button click and input box change are pretty standard
Right click on the simpleCalc.html file in VSCode File Explorer, and select SFDX: Preview Component Locally. Hold your breath until a local server starts up and shows your beautiful component.
You might now be wondering about @track and why you are clicking on the Calc It! button each time. And.. you are right - that’s not quite required since LWC can help us respond to changes without button clicks (since we are tracking the variables anyway).
Let us re-write the logic in simpleCalc.js -
import { LightningElement, track } from "lwc";

export default class SimpleCalc extends LightningElement {
  @track num1;
  @track num2;
  @track result;

  calcExpr() {
    console.log("expr", this.expr);
    this.result = Number(this.num1) + Number(this.num2);
  }

  handleChangeNum1(evt) {
    this.num1 = evt.target.value;
    this.calcExpr();
  }
  handleChangeNum2(evt) {
    this.num2 = evt.target.value;
    this.calcExpr();
  }
}
Now, all you need to do is change the numbers and addition happens automatically.
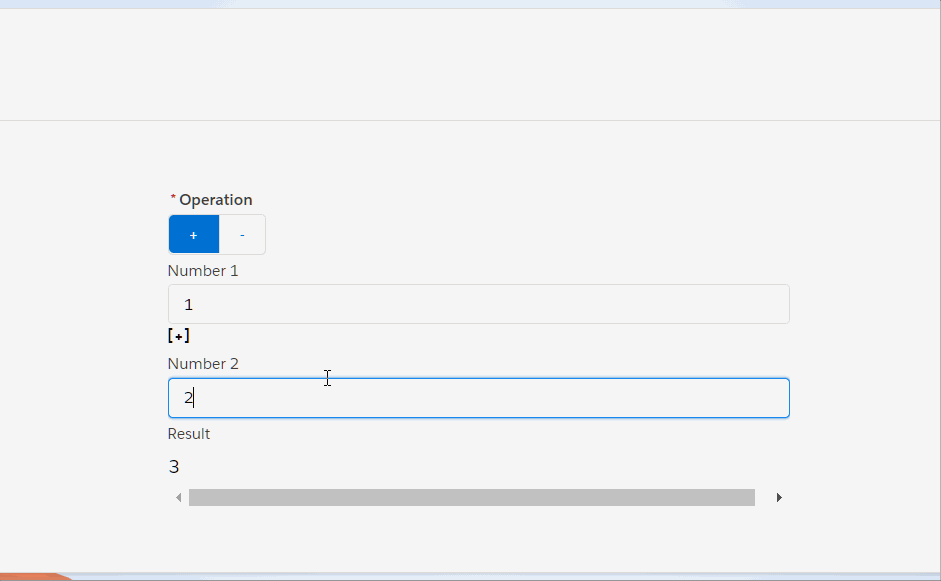
Let us take this up a notch and support simple arithmetic operations.
First, let us change the simpleCalc.html -
- Use a grid to align stuff
- Create one more buttons to support complex subtraction operation
<template>
  <div class="slds-grid slds-gutters slds-wrap">
    <div class="slds-col  slds-visual-picker slds-visual-picker_small">
      <lightning-radio-group
        name="operGroup"
        label="Operation"
        options="{operOpt}"
        value="{oper}"
        required
        type="button"
        onchange="{handleChangeOper}"
      >
      </lightning-radio-group>
    </div>

    <div class="slds-col slds-size_1-of-1">
      <lightning-input
        label="Number 1"
        name="num1"
        onchange="{handleChangeNum1}"
      ></lightning-input>
      <strong>[{oper}]</strong>
      <lightning-input
        label="Number 2"
        name="num2"
        onchange="{handleChangeNum2}"
      ></lightning-input>
    </div>

    <div class="slds-col slds-size_1-of-1">
      <lightning-input
        label="Result"
        name="result"
        read-only="true"
        value="{result}"
      ></lightning-input>
    </div>
  </div>
</template>
The code is very similar to the last time, but we have used a few more components provided by LWC.
Change JS to support the additional operations -
import { LightningElement, track } from "lwc";

export default class SimpleCalc extends LightningElement {
  @track num1;
  @track num2;
  @track result;
  @track oper = "+";

  get operOpt() {
    return [
      { label: "+", value: "+" },
      { label: "-", value: "-" },
    ];
  }

  calcExpr() {
    switch (this.oper) {
      case "+":
        this.result = Number(this.num1) + Number(this.num2);
        break;
      case "-":
        this.result = Number(this.num1) - Number(this.num2);
        break;
      default:
        this.result = "";
    }
  }

  handleChangeNum1(evt) {
    this.num1 = evt.target.value;
    this.calcExpr();
  }
  handleChangeNum2(evt) {
    this.num2 = evt.target.value;
    this.calcExpr();
  }

  handleChangeOper(evt) {
    this.oper = evt.target.value;
    this.calcExpr();
  }
}
That should do it. You now have your own simple calculator in LWC!